
How to manage your organisations ArcGIS Online account
/
In this post, we will look at how to manage users in your organisations ArcGIS Online account. We will cover the following topics:
- What are Named Users
- Why using Roles is a good idea
- How to create custom roles for:
- Students
- Course Leaders
Most of the tasks in this blog are actioned from your ArcGIS Online Dashboard (Fig 1). To get to this, just log into your ArcGIS Online account (<org_name>.maps.arcgis.com i.e. durhamuni.maps.arcgis.com)

In Figure 1 you will see that the top menu (above the header) allows me to move between Home/Gallery/Maps/Scene/Groups/Content/Organisation. Administration tasks tend to live under My Organisation.
What is a named user and why is it a good thing?
ArcGIS Online requires users to be Named Users. This gives each user an identity and storage space for their spatial data and web maps in ArcGIS Online. It also allows account administrators to set user privileges to enable or restrict users.
The concept of User Identity is pervasive in solutions such as Microsoft 365, SharePoint, GitHub, Box, Twitter, Gmail, and many more.
How do I manage named users?
Before we look at how to add users, let’s think about what permissions we want to give users. You can assign a user a “Role” and they will inherit the permissions associated with that role. This is effectively a short-cut for setting up users and will save you time.
A number of roles are set up in ArcGIS Online by default. These include:
• Users cannot publish content or manage the organizational site.
• Publishers can publish content but not manage the organizational site.
• Administrators have full access to the site. We recommend that you designate more than one administrator.
Usually, most of the users would be given Publisher privileges as this allows them to create interactive web map applications. However Publisher also allows users to perform Geocoding and this consumes quite a lot of credits. We would recommend that you disable Geocoding by default and only allow user access if they really need. Most geocoding operations can be achieved in ArcGIS for Desktop without consuming credits.
We would recommend creating a couple of New Roles to better manage your organisations account:
• General User – most users will be set as a General User
• Course Leader – will have extra privileges to enable them to invite users and manage groups of students that they teach
Let’s work through the steps to set up these two new roles.
Create a new General User Role
Creating a new role is easy and can make it much easier to manage your users. To create a new role you need to:
1. Click My Organization
2. Click Edit settings

3. Click Roles
4. Click Create Role
5. Give the Role a new name i.e. GeneralUser
6. Describe the role i.e. a general user with Geocoding disabled
7. Select a Template to base the role on – Select Publisher (this saves us filling in most of the permissions)

8. We can now disable geocoding in the Premium Content section
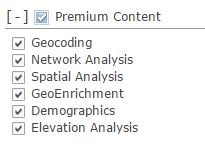
9. Leave the other functions in Premium Content enabled – they do not consume many credits.
10. Click Save Role
We now have a new General User Role which we can assign to most users. If a user wishes to use the disabled Geocoding function, they can request access to the function. Many geocoding procedures can be carried out for free either in ArcGIS for Desktop or online through http://geoconvert.mimas.ac.uk/

If you are unsure about what to recommend, please email highered@esriuk.com and the education team will help you determine the best option.
Create a Course Leader Role
We will now look at how to set up another new role, this time adding in a couple of privileges to allow the new role to invite new users and create groups. This role is designed for staff members who run courses and may wish to manage their students ArcGIS Online accounts, or for a departmental super-user. Note, this role is not the same as the Administrator Role and we would advise that you limit the number of users who have full admin rights over the ArcGIS Online account.
1. Click My Organization
2. Click Edit settings

3. Click Roles
4. Click Create Role
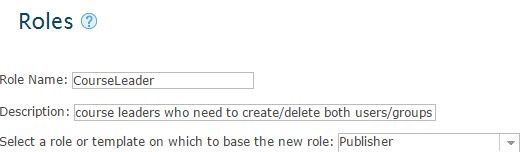
5. Give the Role a new name i.e. CourseLeader
6. Describe the role i.e. course leaders who need to create/delete both users/groups
7. Select a Template to base the role on – Select Publisher
. We can now add extra privileges to the new role – the privileges we want to add are under the Administrative Privileges

9. You may wish to leave Geocoding enabled for the CourseLeader. If you wish to disable Geocoding, uncheck the Geocoding option in Premium Services.
10. Click Save Role
We now have a new Course Leader role that we can assign to staff members which will allow them to:
• Invite users
• Delete users
• Create groups
• Assign users to groups
• Reassign ownership – this will allow them to move a students work into their account to show future classes after the original student’s account has been deleted.
Further information
If you have any questions about this post, please feel free to submit a comment.
Some useful resources on Named Users include:
Predefined Roles:
https://doc.arcgis.com/en/arcgis-online/reference/roles.htm
Configuring Roles:
https://doc.arcgis.com/en/arcgis-online/administer/configure-roles.htm
If you manage an ArcGIS Online account for a Higher Education Institution in the UK or Ireland and wish to ask a technical question, please direct this to highered@esriuk.com