We wanted to add our office locations to a map on ArcGIS.com and then have the ability to embed that map in our website, maybe on the contact page. It struck me that this might be a very common use of ArcGIS.com, so here we will outline the steps we used and a couple of different sharing options for ArcGIS.com.
Part 1 of this series will show you how to prepare your data for uploading to ArcGIS.com.
Part 2 will show you how to create maps, create and symbolise data then share your maps and data on ArcGIS.com.
We will show you a variety of ways to share your office locations map and data via ArcGIS.com including using map packages, layer packages, KML files, CSV files and shapefiles. We will be using the Esri UK and Ireland offices data, ArcMap and some geoprocessing tools for this workflow. For part 1 of this series we will be preparing the data for upload to ArcGIS.com from ArcGIS Desktop version 10 service pack 2.
Data Preparation
- Firstly, open ArcMap and add a base layer.
I always use OpenStreetMap because that’s a personal obsession of mine. - Create a new file geodatabase to store your data.
- Create the point feature class for your offices.
I have chosen to use the following attributes for my data:
Name, Address, Phone, Fax, Url (web address), Img (web accessible image url). These attributes will be filled in for use in the popup of the final web map.
I have chosen to set the spatial reference of my feature classes as WGS84 for ease of integration with ArcGIS.com, however, data created in another coordinate system can be handled acceptably in most of the formats below (except CSV) or be converted if necessary. - Start an edit session, add your points and the attributes and finish the edit session.
- Symbolise your points using simple marker symbols.
 Map document setupYour map should look like the following ->
Now we have created our data we will export it to some useful formats that can be uploaded to ArcGIS.com. Firstly we will create map and layer packages which are useful for sharing between ArcGIS Desktop users, then we will create files (shapefiles, CSV and KML) which are useful for adding to web maps created on ArcGIS.com.
Map Package (.mpk)
A map package will zip up all of the configuration of your map and data sources into a compressed file which you can share with your colleagues via your internal file system or via ArcGIS Online by uploading the package and giving your colleagues access to it. This is a great tool for sharing a snapshot of your map document with others. Before you do this, you should make sure you have filled in all of the metadata for your map document, this can be done in ArcMap using:
File -> Map Document Properties
Where you can fill in the Title, Summary, Description, Author and tags. Also make sure you have set the ‘pathnames’ to store relative path names to data sources.
Then to create the map package, in ArcMap, you will need to navigate to:
File -> Create Map Package
Validate the map package and save it or upload it directly to ArcGIS.com.
ArcGIS for Desktop 10 Help – Map Packages
Layer Package (.lpk)
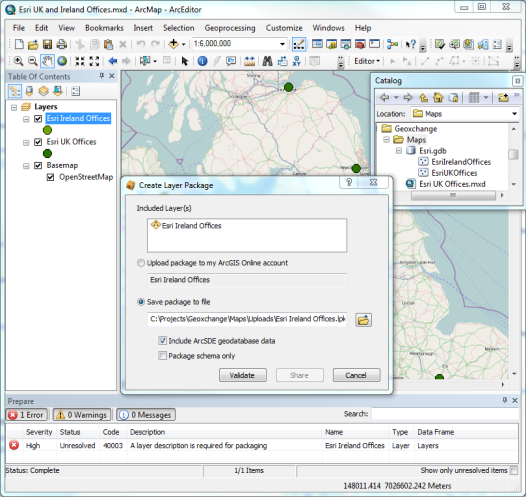 Export layer packageLayer packages are much like map packages with the distinction that you can zip up a single layer from your map document and share that layer with you peers.
To create the layer package, in ArcMap, right click on the layer in the table of contents and select ‘Create Layer Package’. The validate button will check if you have added metadata to your layer, then you can save it to disk or upload directly to ArcGIS.com.
ArcGIS for Desktop 10 Help – Layer Packages
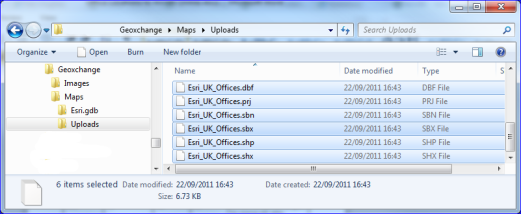
Shapefile (.zip)
Shapefiles can be uploaded to ArcGIS.com and consumed directly on web maps or shared between desktop users.
To create the shapefile to upload, right click on the layer in the table of contents and select:
 Zip up the shapefileData -> Export Data
Follow the defaults and make a note of the saved file location. Then navigate to that location in windows explorer, select all of the individual files that make up the shapefile collection (.dbf, .prj, .sbn, .sbx, .shp, .shx) and zip them into one compressed file.
KML
KML files can be uploaded and added to ArcGIS.com web maps. Here we will show you how to generate a simple KML file for each layer you want to upload. For this step we will use a tool from the toolbox, navigate to:
Conversion Tools -> To KML -> Layer to KML
Select your inputs and outputs and set a sensible scale to display the data – I chose 1:2000000 as I am looking at data on a national scale. Complete the tool and make a note of the saved file location.
CSV
Text files can also be uploaded and added to web maps on ArcGIS.com. ArcGIS.com can geolocate your text files based on the address fields, however I will demonstrate the alternative method here for situations when you don’t have full address attributes. To do this we will use another tool which can be found at:
Data Management Tools -> Features -> Add XY Coordinates tool
I use this tool to add coordinate fields to my data. We simply use our point feature class as the input and the tool will do the rest (i.e. add the Point_X and Point_Y fields to the feature class). As I have set the spatial reference of my data layer to WGS84, there will be no projection issues when importing this data as latitude and longitude are fully supported on ArcGIS.com. Alternatively, I could re-project my data, or use the address fields to geolocate the data.
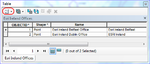 Table Options – ExportNext I need to export the data as a text file. To do this I open the attribute table for the layer by right clicking on the layer in the table of contents and selecting ‘Open Attribute Table’. In the attribute table (right) click on the ‘Table Options’ icon, then select Export. Click the folder icon for the output table and save the output as type ‘text file’, rename the file and give it a ‘.csv’ extension. Save the data ready for uploading to ArcGIS.com.
We’ve created our datasets for sharing internally and externally via ArcGIS.com, now step 2 will show you how to upload and work with the data in the ArcGIS.com environment. Your datasets should end up something like the following …